
Mixing by hand
The one-and-a-half pound christmas cake
RECIPE
There is a magic to Christmas cakes. It is a combination of that intoxicating aroma hitting your senses as you prepare to taste that first morsel. It’s also knowing that each mouthful will have a slightly different flavour from the previous piece as the varying ingredients kick in. Each mouthful is a delicious little surprise packet.
This is the recipe for the Christmas Cake that my mother, and when she no longer could make it, my sister, @atticafinch, uses. Its origins are in the Original Women’s Weekly Cookbook. My copy of this invaluable book is tattered beyond repair and, truth to tell isn’t really mine. I gave it to His Nibs as a wedding present nearly 40 years ago. Of course all measurements in our cookbook are in the old imperial standard, and can cause confusion especially in recipes where ingredient measurements are critical to a successful outcome. This is one such recipe.
Over the years fundamental changes have been made to the recipe. They have resulted from personal taste and experience in what seems to work best. But it is still fundamentally the Women’s Weekly Cookbook recipe – bless their cotton socks.
The one-and-a-half pound fruit cake is named because there is one-and-a-half pounds each of butter and brown sugar. This is the Arnie Schwarzenegger of fruit cakes. The recipe is full proof and tastes divine.
NOTE: This cake requires a square cake tin 30cm (12 inches) deep.
INGREDIENTS
3 kg of Mixed Fruit (6lbs 10oz)
1.25 kg combination of dried: apricots, peaches, pineapple, pears; glacé fruit & mixed peel (2lbs 8oz)
1 & 1/2 cups of Grand Marnier (This is the secret ingredient. It works better with the fruit).
750g of Butter (1 and a 1/2 lbs)
750g of Brown Sugar (1 and a 1/2 lbs)
3 teaspoons of grated Lemon rind
3 teaspoons of grated Orange rind
3 teaspoons of Vanilla extract
6 tablespoons Marmalade (whiskey marmalade is nice)
12 Eggs
7 & 1/2 cups of sifted Plain Flour
1/2 teaspoon of Salt
3 teaspoons of All Spice
3/4 teaspoon of Cinnamon
3/4 teaspoon of Nutmeg
METHOD

4.25kg of mixed fruit soaking in Grand Marnier
- The recipe calls for chopping the fruit, placing it all in a basin and pouring the alcoholic spirit over it. Then cover the basin. We let the fruit soak in the alcohol for a week. Once a day give the fruit and alcohol a stir. The best way to do this is with your hands. The benefit of that is, of course, being able to give them a good lick afterwards. NOTE: It takes up a lot of space in the fridge.
- Cream the butter with the brown sugar, the grated fruit rinds, vanilla extract and marmalade. We call this the goop.
- Add the eggs to the goop, one egg at a time and mixing it in well each time.

Creamed butter and sugar
NOTE: The next two steps require you to alternate between the two.
- After the eggs have been mixed into the goop, add some of the alcohol soaked fruit. NOT ALL AT ONCE. Cup your hands and scoop out the first lot of fruit and put it into the goop. DON’T LICK YOUR FINGERS. You can do this after you have finished. Fold the fruit into the goop. The best and most effective method is to fold the fruit in with your hands. You will burn out any mixing engine unless it is a serious industrial cake mixer, or you will get blisters on your hands if you use a wooden spoon. In both instances they won’t be as effective.
- Fold in a cup of the sifted flour. Again using your hands.
- REPEAT. Fold fruit in the goop. Fold Flour in the goop. Fruit. Flour. Repeat until there are no further ingredients. Mix well. Make sure there is no dry flour left in the goop.
WARNING: This is messy as you will be up to your elbows in deliciously smelling goop. A kitchen hand to help with the supply of the ingredients during last two steps is highly recommended. Be careful the assistant doesn’t try and sneak a little bit of what is happening in the large bowl or plastic bucket in which your cake is being mixed.

Into the tin
- After mixing all your ingredients you are ready to fill your lined tin.
For steps on how to LINE YOUR CAKE TIN see below.
- Fill your tin with the deliciously smelling, can’t wait, intoxicating mixed goop.
- To make sure your mixture settles and has no air bubbles in it you need to drop the tin. I know this step sounds perverse. Get an old bath towel, double it over and put it on the floor. Allow the tin to drop on to the towel from about 12 inches, oh sorry, 30 cm from the floor. Do this a couple of times.
- To glaze the top of the cake mixture. Just before you pop the cake into the oven smooth the top of the cake by wetting your hands with water and gently rubbing it over the top of the cake mixture. It ensures there is a nice even cake top and also gives a semi-gloss sheen to the finished cake.

Glazing top of cake
- Pop it into a pre-heated oven. The temperature is a slow oven for the first hour at 150C and then turn down the oven to a very slow oven at 120C for a further 5.5 to 6 hours.
NOTE: If you have a fan forced or fan assisted oven you will need to adjust your temperatures according to the instruction manual.
FURTHER IMPORTANT NOTE: Every hour turn you cake 90′ clockwise ensuring that your cake cooks evenly.

Into the oven
- After the requisite cooking time check that the cake is cooked by poking the centre of the cake with a skewer or a thin-bladed knife. If it comes out clean it is cooked through.
- As soon as the cake is out of the oven leave it in the tin to cool, but immediately wrap it, cake tin and all, in aluminium foil to stop the top of the cake from hardening.
- When the cake has cooled take it out of its tin, wrap the whole (including the grease proof and brown paper) in aluminium foil, and place it in a huge air-tight cake tin.
LINING YOUR CAKE TIN:
Do this before you start cooking your cake.
You will need to line your tin. The easiest tins to line are square ones (which is just as well as square cakes are easier to cut into equal slabs). The cooking time for the cake is a long one and the paper that lines the tin protects your cake mixture goop, and ensures a more evenly cooked cake.
- Line the tin with two layers of brown paper.
- The next layer is one of greaseproof paper on which you will pour your cake goop. The greaseproof paper has to be 4cm (1&1/2 ins) above the height of the sides of the tin. The cake will rise.
You may wonder why we make such a large cake. This cake lasts the family for ages, well into February. There are no nuts in it as nuts go rancid quite quickly.
It also becomes a source of great Xmas presents. Cut the cake into individual slabs, package them up in a nice cake tin (a Christmassy one if you can), and you have the best of gifts you can give anyone.
I have the recipes for the Quarter-Pound, Half-Pound and One-Pound Christmas Cakes. The procedures for cooking the cakes are exactly the same as I’ve outlined above, however, the ingredient amounts and cooking times vary. Let me know and I’ll happily work out the different measurements for all the ingredients, as well as the applicable cooking times. If you require this in imperial measurements let me know and I’ll happily provide them.
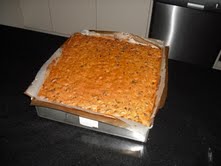
Christmas Cake straight out of the oven.
ENJOY.
And, for the first time this year, Merry Christmas.
EXTRA TIP: We cut this cake a few days after it had been cooked and it still had not been properly rested. If you do this your first few pieces will crumble. We don’t care. We can’t wait. A week later the cake cuts beautifully and tastes even better. This year’s Christmas Cake is a triumph. It also helps to cut your cake with a serrated knife because of the variety and density of the ingredients.

A finished morsel ready to eat. Moist, full of flavour. Perfection.


